 Primarily I have been working on the floor, and in part that accounts for my blogging silence in that it's really not all that picture-worthy. As always, though, there have been other tasks in-between. I'm in such a work work work induced brain fog that I can't really remember what they have been.
 I thought I'd share a little illustration of the challenges of laying floor over radiant heat tubes. For the most part the two are perpendicular to each other, so it's straightforward how not to penetrate the water filled pipes. (Even that's not as easy as it sounds given the monotony of hitting the nailer and once I grazed a tube but THANK THE GODDESS did not puncture it.)
But where the tubes turn they are a little trickier to keep track of. For example this layout: 
looks like this when you place the next board:

and given that you nail on an angle into the tongue of the board, you'd hit the tube in the "no zone."
Other on- goings include that Jennifer has taken on mixing colors for the lime-wash we will use on the plaster walls. (A watered down version of the same material that's in the plaster. It's the same as the whitewash you might have seen in greece or spain, except we are pigmenting it.) This has been a lot of color sampling and counting buckets of this and tablespoons of that.  A painter will come and apply it all next week. Yes, we want to move in and I 'm happy to report that we're having some subcontractors come in to paint and finish floors and such so that I can get to work on cabinets soon so we can MOVE IN!
The other major project has been replacing the long ago thrown together temporary stair with the final one. There are metal elements to my design, so I've been on the computer and shuttling to my neighbor the metal worker. (Only the structure is finished -- there is a whole other side that gets more metal, but that's a little later) .
I had a nice day of volunteer help from friend Stephen -- long island fellow I bonded with over contruction -- to cut these stringers. THey really did turn out very well, and that's the basis of the whole thing. 
Then all the noodling of getting the thick and wavy and imprecise wood to meet the very unforgiving metal:

The treads are slotted in a dovetail shape and the attaching wood slides in so that they are free to expand an contract without -- I hope-- cracking.


Here's how it turned out so far:  With the lovely bonus that the components of the old stair were available to recut and form into a stair to the basement AT LAST. We have been climbing the teetery wooden step ladder that I used to build the saugerties house 20 years ago and it as gotten old just as we have!
 Hasta pronto, espero anyway!
 and more tiling.
  With the exception of some outdoor work, all tiling is now finished. The master bedroom shower was a big job, but I’m very happy with how it turned out. These pictures are pre-grout.
  In anticipation of an open house we had planned we got all the floor tiles grouted. This coming week, I hope to have Sebastian grout the two bathrooms while I continue to get the (local white oak) wood floor down. The bedroom is actually laid:
  but for various reasons I now need to "rack" the rest -- this means laying all the pieces as they will be on the floor -- cut to size etc-- and attaching them only after that's all done. Of course, I must resist temptation to study each piece.... though there are a few standout patterns that have earned special placement:

 We both enjoyed our little open house a great deal. Here are some pics from that starting with a host sampling the fare:


 I build a fully independent unit, like this, back and front shown:
 Each part gets oiled and then after adding insulation to the space between the wall and window, and also wooden blocks that will allow me to attach the frame :
  Then it’s time to put the frame in and force it tight to the window.
 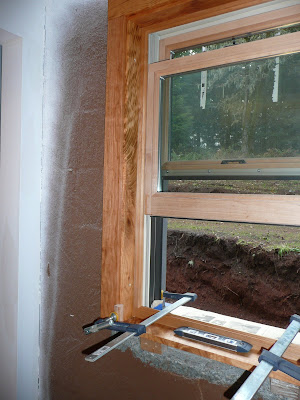 Then it gets screwed in with 4 screws that I will putty over later.
  Finally the bottom piece is nailed in, for the only two face nails in the whole thing Now the window is done and the wall can be plastered:
 *Well, it also takes time because I love wood and I find pieces that take a lot of effort to work into the project, either because they have defects that would normally make them be tossed aside, or because the wood is snarly and hard to work, or not quite big enough to make working it easy... For instance, this particular window incorporated a sill that has all those problems, but I just loved the grain:
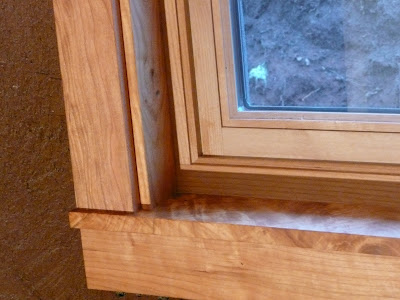 Other progress: Got the base for the shower pan in the master bathroom started and passed the inspection that requires it to hold water for 24 hours without any seeping out at any of the joints. The hardest part of that is where it meets the drain, but mine passed.
  Got Sebastian tiling the first floor bathroom. It took the two of us really as he lays the tiles but I do all the layout and cuts.
  The layout of subway tiles is far more complicated to plan that I would have expected. Well.... they are SUBWAY tiles. I shoulda known!
 Here’s an exciting development:
 Electrician did a bunch of work and we have many switches and outlets.
In general, the space is starting to feel homey to us. It’s still miserably construction-ish, yet we prefer to be there on the weekends to being in our mobile. So much so that this weekend J did her work on the sawhorse construction paper table that seems to have found its place in the dining room-to-be.
Electrician did a bunch of work and we have many switches and outlets.
In general, the space is starting to feel homey to us. It’s still miserably construction-ish, yet we prefer to be there on the weekends to being in our mobile. So much so that this weekend J did her work on the sawhorse construction paper table that seems to have found its place in the dining room-to-be.

 We're having a cold snap right now, but we've got a toasty and dry workplace (if not so much the living space we're still in...) . Quite a contrast to the trials of last year at this time. Although we have been firing the Tulikivi, we haven't done anything with the warming oven -- but it's been getting warm!
  It’s the home stretch of getting the walls done. A little bit more of that – meaning me getting the trim finished up so that Sebastian can get the wall plastered – this coming week and we’ll be all done with walls!
  I have enjoyed the opportunity to woodwork, but I won’t be sorry to be done with window trim! And doors. Here’s the back door into the kitchen. The odd shape of the plaster – can you see those lines of wood? – is because we’re not putting two coats of plaster behind the cabinets. Only a finish coat where the wall will be exposed.


 so that’s what I’m working long hours on, with the usual distractions added in.

 It’s always quite stressful to be up on the slippery roof. I think, unless there’s some problem with something, I’m done going up there, and we actually removed the ladders and platforms and rope. So at the end of this post you’ll see a picture of the house without those things for the first time in a long long time.

 And here is the dining room side, with warming oven.
  I think we’re going to make a lot of use of this. The first few fires are to break in to heater – to allow the moisture from the mortaring to escape and to let the pieces adjust to high heat firing. So this weekend we did the first of those fires:

 So based on a sample window I did in the upstairs closet


 I'm not quite done on the first floor, but the bulk of the plaster is up, and it really is changing the feel of it all. The living room is now completely doneand we ended the week with the window seat wall in the dining room, which is a favorite of mine:
